Main | Info | Links | Contact Me | Skinning | Heads | Sets | New Body Types | HotDate Conversions | Tips & Tricks
Making heads is pretty easy, well after a little practice. I'll show you how I make my heads. Now my techniques are not the same as most, so it's up to you wether you want to do it my way or not. I used PhotoDeluxe(PD) before I got Photoshop(PS) so now I use both to make heads. It's much easier for me but most everything I do in PD you can also do in PS & visaversa. Also my skins have many layers. Most consist of about 30 roughly, but I do this so that if I decide I want to change something it's faster. I can just delete that particular layer instead of having to do things over. Anyway I'll teach you how I drew up the textures on the picture to the left..it uses Thea's Rockabilly mesh;) Let's start:
By Denise | Download it at 3D Sister!
Okay first find a existing head texture at fits the mesh. Find all three different skintone textures for that head. You'll need those to make them for the skintones. Once you've retrived those files open them in Photoshop & use the eyedropper tool & the AirBrush tool to erase the eyes, brows, & lips. Do them for all the skintones;)
Okay now that you've erased all the characteristic features of the face you can start to draw your own faces. I usually start with the eyes. First make the shape of the eyes. I decided I wanted it kind of almond shaped & a little bit slanted (going for the winged make-up look since I want her to be like a punk chick). So I use the airbrush tool or a paint tool & draw one side of the eye (you don't have to do two since you can just take the first eye, copy & flip to make the other side). After that make the white of the eyes in a new layer behind the layers you had the eye shape on. You can use Pure white for the eyeball, anyway later you can darken it. THen when that is finished make a new layer about the white eyeballs. This is for the iris. Pick a nice eye color..I decided on blue, & make some irises like shown in the picture. After that create another layer over that one to make the pupils. Pupils are pretty simple to make...as you can see from the detail circles they are made of three dots & one white dot (sometimes more, sometimes less depending on the eye size). Simple! now after you draw the pupils feel free to merge the iris & pupil layers together. Depends on you. AnyHow, we can make the eyebrows here..so make a new layer but name it "Brows" so you will remember where it is just in case you change the hair color. Okay so brows are pretty easy as well...they should start at the beginning of the eye & end a few pixels past the end of the eye. Make it any shape you want. Iask you can see form the picture I also did lots of shading work around the eyes. What you're gonna need to do is shade darker at both corners of the eyes, & shade lighter under the eyes & where the brow one is at. Now to me the eye still looks a bit flat. All I do is make another layer put it as multiply or darken & put some grey in that area..I also wanted her to have the smokey eye-shadow look so I added some around her eyes as well. Finished!
Now we're ready to do the lips. First pick a color for the lip. It can be flesh tone, pinkish, more redish, whatever you want..you can even have blue lips if it goes with the look you are planning on creating. I decided on red. So I make my lip shape. Verry easy. Just make sure to not make it so big..maybe even save & check in simpose on the mesh;). Now make a new layer & make & divide the lips. Making this division can determine weither your sims look sader, smiley, whatever! Use the same shade but darker. Now go back to the layer where the lips are at. Use the Dodge & burn tools to darken the corners, a little at the bottom & top, & then lighten the middle area to give her a little pout;) Lips!
Now for the dreaded hair....ooooo...scary:P...well it used to be before I got PhotoShop...but PS makes hair so easy & so fun & fast. I think I old make heads now so I can make the hair & play with the smudge tool:P

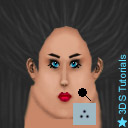
Okay so first with any solid color (Dark grey used here) draw the outline of the hair. Check in Simpose if everything is covered. Then you we can start the fun!

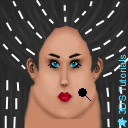
Now use the Burn tools to make hair. Use the Lolipop looking one with the brush shown to make strands of hair very fast. I set Exposure to 30%. I used the white lines to show you how you should be stroking it. There are different strokes for different head meshes. So find out what it is just check out someone else's texture for that same mesh;).

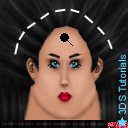
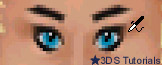
Now we need to darken some areas to add more depth. Use the tool shown & the same stroke from above & darken some areas to define some of the stranks of hair. Exposure should be either 20% or 25%. Keep doing it & also along the way it it gets too dark just lighten the areas..that would be a quick fix. After you get it just right take the lollipop looking tool & at about 25% highlight the area under the dashed links I drew. The result will make it look like the hair has more body & shine.

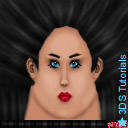
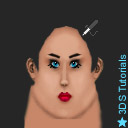
There were some extra things that needed to be added since this is a special mesh with extra parts. Just check out someone else's texture to see where you need to put them;). Well now she's all done. Make sure to to darken the skin next to the hair line just a little to add more realism. Check her out in Simpose & see if you like!...If not...well fix whatever needs to be fixed. Mainly why I have so many layers.

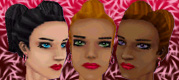
Well from the picture about..you can see they turned out very well for me.:D

Hope this helps! -Denise

Main | Info | Links | Contact Me | Skinning | Heads | Sets | New Body Types | HotDate Conversions | Tips & Tricks